
Interrupts stop the current work of Arduino such that some other work can be done.
Suppose you are sitting at home, chatting with someone. Suddenly the telephone rings. You stop chatting, and pick up the telephone to speak to the caller. When you have finished your telephonic conversation, you go back to chatting with the person before the telephone rang.
Similarly, you can think of the main routine as chatting to someone, the telephone ringing causes you to stop chatting. The interrupt service routine is the process of talking on the telephone. When the telephone conversation ends, you then go back to your main routine of chatting. This example explains exactly how an interrupt causes a processor to act.
The main program is running and performing some function in a circuit. However, when an interrupt occurs the main program halts while another routine is carried out. When this routine finishes, the processor goes back to the main routine again.

Important features
Here are some important features about interrupts −
Interrupts can come from various sources. In this case, we are using a hardware interrupt that is triggered by a state change on one of the digital pins.
Most Arduino designs have two hardware interrupts (referred to as "interrupt0" and "interrupt1") hard-wired to digital I/O pins 2 and 3, respectively.
The Arduino Mega has six hardware interrupts including the additional interrupts ("interrupt2" through "interrupt5") on pins 21, 20, 19, and 18.
You can define a routine using a special function called as “Interrupt Service Routine” (usually known as ISR).
You can define the routine and specify conditions at the rising edge, falling edge or both. At these specific conditions, the interrupt would be serviced.
It is possible to have that function executed automatically, each time an event happens on an input pin.
Types of Interrupts
There are two types of interrupts −
Hardware Interrupts − They occur in response to an external event, such as an external interrupt pin going high or low.
Software Interrupts − They occur in response to an instruction sent in software. The only type of interrupt that the “Arduino language” supports is the attachInterrupt() function.
Using Interrupts in Arduino
Interrupts are very useful in Arduino programs as it helps in solving timing problems. A good application of an interrupt is reading a rotary encoder or observing a user input. Generally, an ISR should be as short and fast as possible. If your sketch uses multiple ISRs, only one can run at a time. Other interrupts will be executed after the current one finishes in an order that depends on the priority they have.
Typically, global variables are used to pass data between an ISR and the main program. To make sure variables shared between an ISR and the main program are updated correctly, declare them as volatile.
attachInterrupt Statement Syntax
attachInterrupt(digitalPinToInterrupt(pin),ISR,mode);//recommended for arduino board
attachInterrupt(pin, ISR, mode) ; //recommended Arduino Due, Zero only
//argument pin: the pin number
//argument ISR: the ISR to call when the interrupt occurs;
//this function must take no parameters and return nothing.
//This function is sometimes referred to as an interrupt service routine.
//argument mode: defines when the interrupt should be triggered.
The following three constants are predefined as valid values −
LOW to trigger the interrupt whenever the pin is low.
CHANGE to trigger the interrupt whenever the pin changes value.
FALLING whenever the pin goes from high to low.
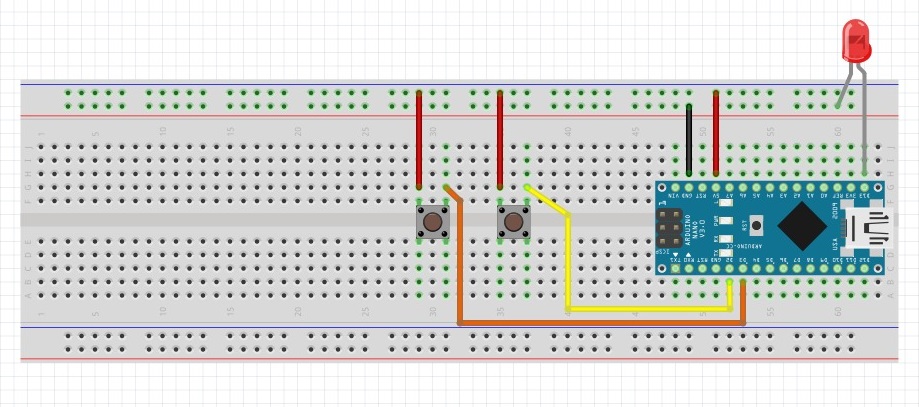
Breadboard:
Example:
volatile boolean ledon = false;
void setup(){
pinMode(A7, OUTPUT);
pinMode(2,INPUT);
pinMode(3,INPUT);
pinMode(2,HIGH);
pinMode(3,HIGH);
attachInterrupt(digitalPinToInterrupt(2),buttonPress1,FALLING);
attachInterrupt(digitalPinToInterrupt(3),buttonPress2,RISING);
Serial.begin(9600);
}
void loop() { // put your main code here, to run repeatedly:
bool val=analogRead(A7);
Serial.println(val);
}
void buttonPress1(){
if (ledon){
ledon=false;
digitalWrite(A7,LOW);
}
}
void buttonPress2(){
if(!ledon){
ledon=true;
digitalWrite(A7,HIGH);
}
}
Further Readings:
http://gammon.com.au/interrupts