
I worked on an Arduino project recently, it was working fine on the bench, but in field it was having erratic behaviour of hanging up abruptly. I used Arduino Mega 2560 board with three serial devices on hardware serial, an I2C and SPI bus. The program would start and hang after a few seconds, it kept waiting in a while loop expecting a reply from the serial device, after a few reset it would function just fine. I did not notice it on the bench as I was constantly tweaking the code and uploading it. I solved it using the watchdog timer, read along to know how.
What is a watchdog timer anyway?
The watchdog timer is a timer to detect malfunction and recover from malfunction. It a timer that has to be enabled by the user, it is off by default. This timer is present in most of the micro-controllers.
So how does it work?
At its heart it’s a timer, that starts counting from 0 to a threshold value set by user, let’s say its 2 seconds, so the timer starts from zero and counts to 2 seconds, we must reset the timer back to zero before it reaches 2 seconds. If it reaches 2 seconds, it will cause the program to reset. The simple block diagram will help in understanding it better.
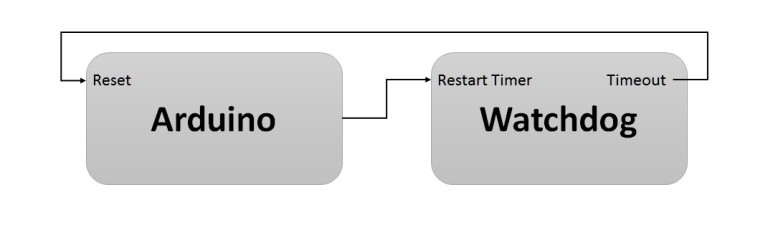
This called a single stage watchdog timer, some advance micros have multi-stage watchdog timer, and timeout in each stage triggers a corrective action, if all stages timeout the micro is reset.
How to use the watchdog timer in your project?
In order to use this timer in your Arduino project, you must first enable it. This guide applies only to Arduino that uses AVR and not the ARM micro, in other words it for UNO, Mega 1280, Mega2560 and boards with ATMega8 and ATMega168.
First is to include the header file to your program/sketch.
#include <avr/wdt.h>
Next enable the watchdog timer in the setup()
wdt_enable(WDTO_2S);
Watchdog can be enabled anywhere in the sketch, but I recommend it using it in the setup section.
After enabling the timer, it must be reset within 2 seconds else, it will restart the program/sketch. The threshold values are predefined and cannot be set by the user.
Here is table of the times
| SL NO | THRESHOLD VALUE | CONSTANT NAME |
| 1 | 15 ms | WDTO_15MS |
| 2 | 30 ms | WDTO_30MS |
| 3 | 60 ms | WDTO_60MS |
| 4 | 120 ms | WDTO_120MS |
| 5 | 250 ms | WDTO_250MS |
| 6 | 500 ms | WDTO_500MS |
| 7 | 1 s | WDTO_1S |
| 8 | 2 s | WDTO_2S |
| 9 | 4 s | WDTO_4S |
| 10 | 8 s | WDTO_8S |
Next you have to put below code line at various place in your loop() code to prevent the program from resetting the Arduino.
wdt_reset();
Caution
When Arduino starts, it executes the boot-loader and then jumps to your sketch. It is stated in the data sheet that
“If the Watchdog is accidentally enabled, for example by a runaway pointer or brown-out condition, the device will be reset and the Watchdog Timer will stay enabled. If the code is not set up to handle the Watchdog, this might lead to an eternal loop of time-out resets. To avoid this situation, the application software should always clear the Watchdog System Reset Flag (WDRF) and the WDE control bit in the initialization routine, even if the Watchdog is not in use.”
So if in case the WDT is enabled after reset and the time out is set to small value, it might never come out of the boot-loader and keep on resetting, so its advisable to set the time out to a higher value, I use 8s threshold.